Have you tried any of these recipes?

Have you tried any of these recipes? If you have, please leave a comment to let me know how it worked for you and if you suggest any changes!

Tuesday, December 17, 2013

Mostly Savory Chocolate Bark

This chocolate bark is unlike anything you're likely to encounter in the month of cookies and cakes.  That is why I like it!  I'm not one for pastries or sweets, but some good dark chocolate will certainly do it for me!  This one is full of flavors and just a bite is plenty!

Nutty chocolate bark
Now my new favorite breakfast
With a cup of tea

Ingredients

  • 2 cups semisweet chocolate chips
  • 1 tsp ground cardamom
  • 1/4 tsp dried mulberries
  • 1/4 cup dried tart cherries
  • 3/4 cup almonds, toasted and coarsely chopped
  • 1/2 cup pistachios, toasted and coarsely chopped
  • 2 tsp coffee beans, coarsely chopped
  • pinch of kosher salt
  1. Grease a baking sheet, and line it with parchment paper.
  2. Melt the chocolate in a large stainless steel bowl placed over simmering water in a pot.  Make sure the bowl is not touching the water to keep the chocolate from scorching.  
  3. Add the cardamom, and stir to dissolve for a couple of minutes.  Turn off the heat, and stir in half of the mulberries, cherries, almonds and pistachios.
  4. Remove the bowl from the heat, and dry the bottom with a towel.
  5. Pour the chocolate onto the prepared baking sheet.  With an offset or rubber spatula, spread the chocolate in a wide rectangle about 1/4 inch thick.  Sprinkle with the remaining nuts, dried fruit, and the coffee beans, and press them gently into the chocolate.  Dust with the salt.
  6. Cool in the refrigerator for about 2 hours, until hard.  When firm, slide chocolate onto a cutting board, and cut or break it into pieces.  Keep it refrigerated until just before serving.


Recipe taken from YogaJournal, December 2013.

Friday, December 6, 2013

Mediterranean Turkey Meatloaf

Meatloaf is one of those comfort foods that is so easy to prepare, great for leftovers, and can be made with mostly anything.  Some people have started replacing ground beef in their recipes with turkey.  However, turkey has a completely different flavor and needs a different set of ingredients to complement it.  Here is my latest take on a turkey meatloaf:

There is no such thing
As a beautiful picture
Of plain-old meatloaf

Ingredients
  • 2 lbs ground turkey
  • 1/4 cup oil
  • 2 egg whites
  • 4 oz feta cheese, crumbled
  • 1/4 cup pine nuts
  • Lard or oil
  • 3 garlic cloves, chopped
  • 2 tbsp fresh chopped oregano
  • A handful of radishes, finely chopped
  • Two handfuls of fresh spinach
  • 1/2 cup breadcrumbs
  1. Heat the lard or oil over low to medium heat on the stovetop.  Sauté the garlic approximately one minute.  Add the oregano and set aside after it has passed another minute over the heat.
  2. Grease a meatloaf pan or other oven-safe dish and preheat oven to 350F.
  3. In a large bowl, using your hands, combine the turkey, oil, eggs and breadcrumbs.  Add the garlic and oregano mixture and stir.  Continue adding ingredients, one at a time, mixing with your hands until the cheese, pine nuts, radishes and spinach are combined.  (Save the spinach for last.)
  4. Shape the meatloaf into your pan (it will be sloppy due to all the moisture) and bake, uncovered for 90 minutes or until it comes away from the side of the pan and turns crispy at the top and edges.
Excellent served with sweet potato fries.

Tuesday, December 3, 2013

Will it be Food Pics or Cat Videos that Take Over the Internet?

I've noticed that there is some annoyance out there in the social media world towards people who take pictures of their food and share them with the rest of the world.  I understand.  Your life is too full of real things for you to care about what someone you hardly know had for dinner.  And as is the case with most social media - you didn't ask for the picture - it was thrust upon you as you were innocently scrolling through pictures of babies in their first suspenders and cats who have not only made their owners work for them, but have started a campaign to take over the internet.


I take pictures of my food.  I do so with glee.  GLEE.  And when I post a picture of my food, it is because I'm still savoring it.  I feel like, for me - what my meal looks like represents my current life or state of mind to a certain point.  There are times, honestly, when I think my best foot forward or my most photogenic side is the meal I just created.  It might represent something just for myself - how colorful, or fresh, or gloopy I'm feeling.  And it might represent what I want to convey to the people I'm cooking for - "I'm comfortable with you," "you make me feel warm," or "our weekend is going to be zesty/fiery/rich."

What we eat says so much about us already, and if we're proud or excited to share it, I think those of us that do are sharing something significant of ourselves.  So, go ahead and post those pictures!  (Not like anyone can stop those of us that do!)  I want to see your fancy gougères that you put so much time into.  And I'll probably even give you a thumbs up/heart/like for your picture of your late night peanut butter toast and iced gin because it says a bit about your day and how you've chosen to celebrate it/wallow/comfort yourself.

So, cheers!


You can find more of my food pictures on instagram and twitter, though I must warn you - I'm also one of those annoying people who posts copious pictures of her dog.


See?  It's because she's SO CUTE!  And I'm sure you think so too!  Right?

Sunday, December 1, 2013

Colorful winter salad

I'm always looking for a bit of color in my meals, and while I'm not typically a salad fan (or a fan of cold foods generally), the days that follow Thanksgiving lend themselves to crisper, lighter fare.

Lighter winter fare
I only like salads with...
Fresh avocados

Ingredients  (serves two as a meal or four as a side)
  • Butter lettuce (one small head)
  • 1 Fresh persimmon, 1/4 papaya, or 1/2 pink grapefruit (listed in order of my favorite) 
  • 1 Avocado
  • 2 tbsp Pumpkin seeds
  • 2 oz. Blue cheese
  • Greek yogurt (1/4 cup)
  • Olive oil (1/4 cup)
  • Juice from half of one lemon
  • A pinch of salt
  • Freshly grated black pepper
  1. Wash the lettuce thoroughly, pat dry, and chop into bite sized leaves.
  2. Start the pumpkin seeds toasting over medium heat in a small saucepan (they will turn fragrant, pop a bit, and turn browner) shaking them around frequently.
  3. In a food processor, combine the yogurt, olive oil, lemon and salt until blended
  4. Cube the fruit and the avocado.
  5. Combine all ingredients into low bowls, crumbling the blue cheese on top and finishing with the freshly grated pepper.

Thursday, November 14, 2013

Veggie Goat Cheese Breakfast Bake

This is a great and easy meal to make for breakfast or lunch and I find if you double the recipe, you can save half of the goat cheese mixture in the fridge for several days and make it again with whatever vegetables you have on hand!  I made this one with sautéed mushrooms and kale.

Here is all that's left
I tried to take a picture
We ate too quickly


Ingredients:

  • Whatever vegetables you have on hand, chopped and sautéed (raw will do as well!)
  • 5 ounces of goat cheese
  • 2 Tbsp heavy cream
  • 1 cup of egg whites
  • 1/8 tsp ground black pepper
  • 1 tsp fresh thyme leaves
  • oil for greasing the pan
  • rehydrated sun-dried tomatoes (optional)
  1. Preheat the oven to 350F.
  2. Saute the vegetables you have chosen to use
  3. In a mixing bowl combine the goat cheese, cream, egg whites, pepper and 1/2 tsp of the thyme, stirring until completely incorporated.  Set aside.
  4. Grease a baking pan.  Transfer the sun dried tomatoes and vegetables to the baking pan.
  5. Pour the goat cheese mixture over the vegetables and top with the remaining thyme.
  6. Bake for 30 minutes, or until the edges are golden brown and the center is no longer liquid.
  7. Let cool a few minutes before serving.
A new picture to show what it really looks like. June 2019 and I've taken to cracking a couple of eggs into the bake. They're beautiful and add some lovely color.


Recipe adapted from Mariel's Kitchen.  Thank you to Connie, my mother-in-law for the fun new baking pan!

Thursday, October 24, 2013

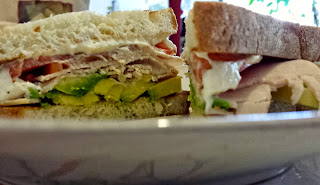
My favorite sandwich á la Swim Cafe

I've never been really fond of sandwiches, have never been a big bread eater (it turns out I have gluten sensitivities), and don't eat much meat.  But sometimes, there is something so satisfying about a sandwich, and when you come across a good one, I find I tend to want it every day until I've gone through the whole loaf of bread.  And philosophically speaking, a sandwich is the Middle Way or Golden Triangle of lunch.  It is made to make every bite contain just a bit of everything - balanced tastes and moderation.  I mean..... if it is a good sandwich.

The cafe down the street from me makes some fabulous sandwiches with really great ingredients and I've been enamored with their turkey sandwich for a while now.  The trouble is, it really depends on who makes it.  So, from now on, it's going to be me!


When the cravings strikes -
Crusty bread, tasty toppings - 
Make me a sandwich!

Ingredients

  • White bread, two slices
  • 2 Tbsp cream cheese
  • 2 tsp horseradish
  • Thinly sliced turkey
  • Avocado (about half of one small)
  • Tomato (ripe, juicy)
  • Freshly ground black pepper
  1. NSoften the cream cheese approximately 15 seconds in the microwave and whisk the horseradish in, making a thick, smooth cream sauce.
  2. Toast the bread.  On one side of the bread, spread the horseradish cheese spread.  Top with very thinly sliced tomato and black pepper.
  3. Layer thinly sliced avocado on the other piece of bread.  Top with turkey.  Put the sandwich together, cut on a diagonal with a serrated knife (to avoid pressing all the ingredients out the side of the sandwich) and devour!
Rather than toast the bread, the sandwich can be constructed first and the entire thing grilled in a buttered pan or griddle.  You know... If you want to be decadent about it.  If you're not though, the sandwich is approximately 330 calories of energy and good taste.

Tuesday, October 8, 2013

Crock-Pot Chicken Noodle Soup

I have been making this recipe for years now, and every time, I'm so excited to sit down and eat it, I forget to take a picture and blog about it.  (Full disclosure - I've actually never made this recipe.  My husband has made it every single time and it is fabulous.)

Chicken Noodle Soup
Just as it was meant to be
And not from a can


Ingredients:

  • 4 bone-in, skin-on chicken thighs
  • 1 Tbsp unsalted butter
  • 6 carrots, peeled and sliced into 1/2 inch rounds
  • 4 celery ribs, sliced
  • 2 medium onions, chopped
  • 4 medium garlic cloves, minced or pressed (about 4 tsp)
  • 1 tsp dried thyme
  • 1/4 tsp red pepper flakes
  • 2 quarts low-sodium chicken broth
  • 2 bay leaves
  • 2 bone-in, skin-on split chicken breasts
  • 2 cups cooked egg noodles
  • 1 cup frozen peas, thawed
  • 2 Tbsp minced fresh parsley leaves
  1. Pat chicken thighs dry with paper towels and season with salt and pepper.  Melt butter in heavy pan over medium-high heat.  Add chicken thighs, skin side down, and cook until skin is deep golden brown, about 8 minutes.  Transfer thighs to crock pot.
  2. Pour off all but 1 Tbsp fat from pan.  Add carrots, celery, and onions to now-empty pan and cook until softened, about 5 minutes.  Stir in garlic, thyme, and pepper flakes and cook until fragrant, about 30 seconds.  Add 1 cup broth to pan and scrape up any browned bits with wooden spoon.  Transfer vegetable mixture, bay leaves, and remaining broth to crock pot.
  3. Season chicken breasts with salt and pepper and wrap in foil (make a foil packet around each breast).  Place foil packets in crock pot.  Cover and cook on low until breasts are cooked through and thighs are tender, 4 - 4 1/2 hours.
  4. Remove foil packet from crock pot.  Carefully open foil and transfer chicken breasts to plate.  Remove chicken thighs from crock pot and transfer to plate.  When cool enough to handle, shred meat into bite-size pieces, discarding skin, bones, and excess fat.
  5. Stir shredded chicken, cooked noodles, peas, and parsley into slow cooker.  Cover and cook until heated through, about 5 minutes.  Discard bay leaves.  Serve.


Usually I refrain from adding the noodles to the soup.  I pack up a third of the soup and freeze it, and the rest we eat for lunch over a couple of days.  I have poured this soup over noodles, over rice, and even over mashed potatoes.  All possibilities if you don't cook and add the noodles to begin with.

I asked my husband if there were any other little changes that he makes and he said no.  The recipe is perfect.  Make it this autumn and let me know what you think!  It is well worth the planning.

Recipe from Cook's Illustrated, Winter 2010.


Tuesday, September 10, 2013

Dark Mint Organic Chocolate - a Review

Okay.  Fanny May Mint Meltaways.  After Eights.  Frango Mints.  We're talking tastes of this caliber here.

I recently tried The Alter Eco Dark Mint Chocolate without much in terms of expectations - I think my local grocer was out of the quinoa bar I usually get (think Nestle crunch but better).  It was delicious.  It is a little pricey, but my local chocolate expert said it is worth it.  


And it gets better.....

What if eating this tasty tasty chocolate nourished more than just your little soul?  The company Alter Eco is doing their best to be environmentally sustainable (which is important if we want to keep eating chocolate).  Their chocolate is organic.  They're trying to offset their carbon footprint.  They compost and recycle.  They plant trees.

So, now you can do your part and eat some chocolate!

Nom nom nom.......

Monday, September 2, 2013

Summer Squash Pomodoro á la Green Zebra

Every meal I have had at Green Zebra has been a good one.  When I do a tasting menu - I'm not left hungry, like I am at so many other posh restaurants.  The last time I was at Green Zebra, my entree was a summer squash pomodoro with rice.  Gluten-free.  Tasty.  Satisfying.  I made it at home and everyone loved it.  I'll share it with you today!  (serves 4)


Ingredients

  • Summer squash - 4 small, thinly sliced
  • Eggplant - 1 medium, cut into pencil-thick strips
  • Rice - 1 cup, uncooked
  • Garlic - one clove
  • Cremini Mushrooms - 1/2 cup chopped
  • Pine Nuts - 4 Tbsp
  • Fresh Basil - chopped, 8 Tbsp
  • Sauce - store bought, previously made and frozen, or from your own tasty recipe
  • Butter - 2 Tbsp
  • Olive Oil
  • Freshly Ground Black Pepper
  1. Prepare the sauce if making from scratch.
  2. Cook the rice and set aside.
  3. Heat the sauce if using ready-made.
  4. Melt one tablespoon of butter with a little olive oil and sauté the summer squash.  Ladle sauce into low-bowls and arrange the squash on top of the sauce.
  5. Add a little more olive oil and sauté the eggplant, sprinkled with a little salt.
  6. Place a scoop of white rice in the center of each bowl, on top of the squash.  When the eggplant is cooked, add pieces to the side of the squash and rice on each dish.
  7. Add the other tablespoon of butter to the sautéing pan and melt with a little olive oil.  Add the garlic and sauté until fragrant.  Add the mushrooms and cook, stirring frequently.
  8. Sprinkle each dish with 1 Tbsp of pine nuts.
  9. Grate black pepper onto each dish, top with mushrooms and fresh basil and serve immediately!
Green Zebra used sticky rice, and I used what I had on hand.  With sticky rice, you may be able to wrap the rice in the summer squash as I was unable to do.  If so, it'll be fancier, you can charge more (we're onto you, Chicago restaurants!), and it should look like this:


Monday, July 1, 2013

Pasta with Artichokes

For my birthday, I received a set of low bowls with artichokes printed on them.  At every subsequent meal that week, when I would get to the bottom of my dish, I'd find myself hungry for artichokes.  Enough was finally enough!  This dish is so tasty, and so quick.  The egg really makes the texture complete.


Ingredients:

  • 1 can artichoke hearts
  • two servings black soba noodles
  • two cloves garlic
  • 3-4 Tbsp butter
  • 1 Tbsp olive oil
  • 2 eggs
  • Garnish:  black olives, fresh parsley, parmesan cheese
  1. Set the eggs to boil (7 min, once the water is at a full boil).
  2. Drain and chop the artichoke hearts
  3. Mince the garlic cloves
  4. While the eggs cool to be peeled, melt the butter and olive oil over low heat.
  5. Set water to boil for the noodles
  6. Add the garlic and simmer until fragrant (approx. 1 minute)
  7. Add artichokes and simmer over low heat in the butter and garlic, tossing to coat, approx 5 minutes.  Peel and chop the eggs.
  8. Drain and serve the noodles, topped with chopped hard boiled egg and the artichokes.  Garnish with black olives, parsley and freshly grated parmesan cheese.

Tuesday, April 23, 2013

Spring Mascarpone Risotto a la Salish Lodge in Snoqualmie, Washington

Who doesn't like risotto?  And what better way to celebrate the early days of spring than with a risotto containing all of springs heartily-missed delights?  I recently had a wonderful risotto while on vacation and staying at Salish Lodge in Snoqualmie, Washington.

Tally-ho!  It's Spring!
Asparagus Risotto
ANY time of day

Ingredients:

  • Shallot (1 small, chopped)
  • Garlic (2 cloves, chopped)
  • Olive Oil, 1 1/2 Tbsp
  • Butter, 1 1/2 Tbsp
  • Risotto, 1 1/2 cups
  • Dry White Wine, 2/3 cup
  • 4 -5 cups broth (chicken or mushroom, I used both)
  • Asparagus, approx 1 lb
  • One bunch of ramps
  • One handful of frozen peas
  • 1 Tbsp lemon zest
  • 1/2 cup mascarpone cheese
  • 1 1/2 cup shredded Parmesan cheese
  • lemon juice from two lemons
  • 1 egg white
  • salt
  • black pepper


  1. Heat a large sauteing pan or wok with medium heat and add olive oil and butter.  Add the shallot and garlic and sauté until aromatic.  Add the rice and stir to cover in the mixture.
  2. Add the wine to the pan and stir until the rice has absorbed the wine.
  3. Begin to add the broth, one ladle at a time and stir until the broth is absorbed.  This will take about half an hour.
  4. In the meanwhile, blanch the asparagus and the ramps in salted water and set aside (chop them to the size that appeals to you).
  5. After about 20 minutes of adding and stirring broth to the rice mixture, throw in the asparagus, ramps and frozen peas.  Continue stirring and adding broth.  Add the lemon zest.
  6. When all of the broth has been added and absorbed, turn off the heat and add the cheeses and stir well.
  7. Let the risotto sit a few minutes before serving.  At this time, add the lemon juice, egg white and a couple of ice cubes to a drink shaker and shake until the mixture is frothy and light.
  8. To serve, spoon the risotto in small bowls, top with a bit of the foamy lemon juice mixture and garnish with freshly grated black pepper.
 The original at Salish Lodge

A view of Snoqualmie Falls.  It is nice to have something this gorgeous to look at while you're enjoying your asparagus risotto.

Under-the-weather Eating

So, I have a bit of a neck injury and haven't been able to do much cooking since November.  So, sometimes "cooking" is more a mix of heating things up and throwing things together.  Here are a few tips I've learned this winter when I couldn't do much more than that:

1.  Fried rice is so easy to make at home.  White rice keeps for ages in the fridge and you can cook up a fresh batch of fried rice in minutes if you have cooked white rice on hand.  A bit of soy sauce, some broth, a dash of hot sauce that came with Thai take-out that you threw in the door of your fridge, several eggs, and whatever vegetables you have on hand.

2.  Pan-frying fish is quick and easy and super tasty if you coat it first in eggs, and then in flour..... but add something like curry powder to the rice you're going to use to coat the fish for added flavor.

3.  Chicken soup actually IS good for the soul.  And the neck.  The crock-pot chicken soup recipe from the Winter 2010 volume of Cook's Illustrated is FABULOUS.  You should absolutely wrap the white meat in foil if you are going to cook it in a crock pot to keep it moist and cooking well on the bone.  If you can get someone else to make it for you.... even better!
Related Posts with Thumbnails